The USB Raspberry Pi Zero showmewebcam (version 1.8) is a plug-in-and-it-works webcam system whereas to run its camera settings utility program, "camera-ctl" , requires arcane technical skills to perform a multi step process. This picamctl.sh script automates running the "camera-ctl" utility. As of this writing, picamctl.sh works for Mac OS X systems and works on a Raspberry Pi 4 running a Raspbian system and a 2009 MacBook running Ubuntu 20.04. It is likely to work in other Linux systems with no or some fixing.
picamctl.sh automates the following:
- Determines the USB connected Raspberry Pi Zero showmewebcam's most likely serial device port name.
- Establishes a 115200 baud serial connection to the Raspberry Pi Zero showmewebcam in a screen session. (screen is the name for a common, required communication utility.)
- Logs into the Raspberry Pi Zero showmewebcam as root. (Login as of showmewebcam version 1.8 is not required. However, the script's attempt to login inadvertently nulls a remaining problem with showmewebcam's startup. So the script is unchanged in this regard.)
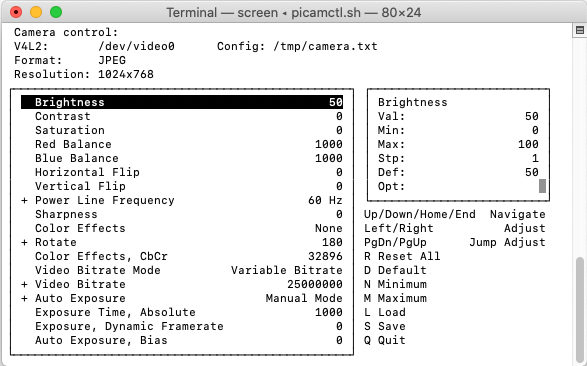
- Starts the showmewebcam system's "camera-ctl" utility.
picamctl.sh also does the following:
- Adjusts its running behavior according to whether it is running on Apple OSX or Linux systems.
- Starts Apple's PhotoBooth application. On Linux systems the Webcamoid application is started. You can alter or remove that application starting feature from the script as needed or use the -c command argument explained later on. PhotoBooth comes preloaded on Apple computers. On Linux systems Webcamoid will need to be installed. picamctl.sh expects to find Webcamoid at /usr/bin/webcamoid on a Linux computer.
- Removes all existing attached and detached screen instances. Here "screen" refers to a needed utility command and not to a screen as a layperson would think. It is mentioned here only for the cognizant. Unused screen instances are typically left over by the communication method used to run "camera-ctl" .
- Checks for the required screen utility command existence. Some systems may not have screen installed. picamctl.sh stops and advises regarding how to load the missing screen installation.
- In Linux, the screen command requires root user rights. picamctl.sh stops and advises regarding how to run picamctl.sh as root user.
picamctl.sh is written to comply with sh shell standards for use on an Apple OS X or a Linux computer. Look online to explain how to perform any unfamiliar steps mentioned below.
- Download (Right click and select "Save Link as ..." or its equivalent.) picamctl.sh to your computer. Then move the file to the directory where you want it stored.
- In a Terminal session, change to the directory that holds picamctl.sh. Then mark picamctl.sh as executable using the command chmod +x picamctl.sh.
- If on a Linux system, install Webcamoid or your choice of USB webcam video using application.
- Open a Terminal window.
- In the Terminal window change the current directory to be the one where you copied picamctl.sh.
- Plug the Raspberry Pi Zero showmewebcam webcam system USB cable into the computer. It will start its booting process.
- In the Terminal window type in "./picamctl.sh" or "sh ./picamctl.sh". On Linux systems type in "sudo ./picamctl.sh" or "sudo sh ./picamctl.sh" to run as root user. The system will prompt for the root user password in that case.
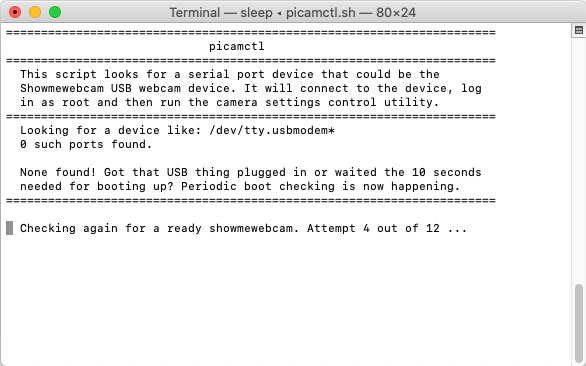
- The showmewebcam system may or may not be finished booting by the time you run the picamctl.sh script. The script looks 12 times for the booted webcam system to show up to allow for a late startup.
- The Terminal window should now be logged into the Raspberry Pi Zero showmewebcam system and showing the camera control interface.
- On Apple OS X systems the application PhotoBooth will start. On Linux systems the application Webcamoid will start. Other applications in lieu of these default applications may be started by using the -c command argument as described below.
- -d: Diagnostic Mode - When picamctl.sh is started using the argument -d, for example "./picamctl.sh -d", the script halts after printing out diagnostic information. Use this mode for troubleshooting the serial device name or the client names. The -d argument diagnostic mode halts the script before the script repeatedly tries to see the showmewebcam device complete its booting process. Perform subsequent "./picamctl.sh -d" runs to observe the booting process yourself.
- -m: Manual Login - As of showmewebcam version 1.8 login happens automatically, but the reason for why the automatic login was implemented, which is to avoid a prompting issue, still remains. Using the -m argument ends up showing you the prompting problem. The -m argument is vestigial at this time.
- -nc: No Client - Do not run the client application.
- -c: Client - Set the client application to be the next argument text. For example ./picamctl -c "Quicktime player" sets the client application to Quicktime player on typical Apple OS X systems. The client application name argument might need to be a full path name such as "/usr/bin/webcamoid" for Linux systems.
- -h: Help - Show help regarding runtime arguments.
- picamctl.sh is composed for sh. It runs also in Bash.
- In this script the remote logging into the Raspberry Pi Zero happens in a detached terminal screen session where the user name "root", the password "root" and the application name "camera-ctl" are passed into the detached screen. Finally, the detached screen is attached, thus making it visible. The timing sometimes does not happen as it should. The result can be an improper connection. Unplug the USB connection and then repeat the startup procedure.
- The quality of the USB cable used for connecting the Raspberry Pi Zero had been found to influence whether or not the Pi Zero serial connection is made or sustained. The host computer also plays into this issue. For example a cheap noodle USB cable has been observed to function OK for connecting to an Apple MacBook but fails when connecting to a Raspberry Pi 4. When used with the Raspberry Pi 4 the serial device would register at the Pi 4 perhaps 1 out of 20 times and would always vanish within 5 seconds.
- Rerunning picamctl.sh when the showmewebcam system is already running camera-ctl often results in an unrefreshed or partial looking camera-ctl view. The fix is to restart camera-ctl, but unplugging and replugging the USB cable to effectively restart everything is not necessary. The showmewebcam system can remain booted. Instead, press the key q in the camera-ctl interface. This quits the running instance of camera-ctl. You should see the # prompt at the lower left corner. Now type in "camera-ctl" followed by a return or enter keypress. One can also press the up arrow followed by a return or enter keypress. camera-ctl will restart with a fully refreshed view.
- Some client applications, like Webcamoid for example, have camera settings controls. These settings typically override the default settings you may have saved using camera-ctl. Each settings change you make is not updated in each of the application settings interfaces. In order to have camera-ctl update its settings to show changes made at the client application you need only q quit camera-ctl and restart camera-ctl as previously described.
- Running picamctl.sh is possible by double clicking the file in file browsers in both Apple OS X systems and in Linux systems. In Linux systems choose "Execute in Terminal" when prompted. In Apple OS X systems you need to first set the OS to open *.sh files in the Terminal application or other similar applications such as iTerm2. This is done by right clicking on picamctl.sh in the Finder and following the necessary selections under Open With. This might require using the Other... selection followed by changing the Enable selector to All Applications.