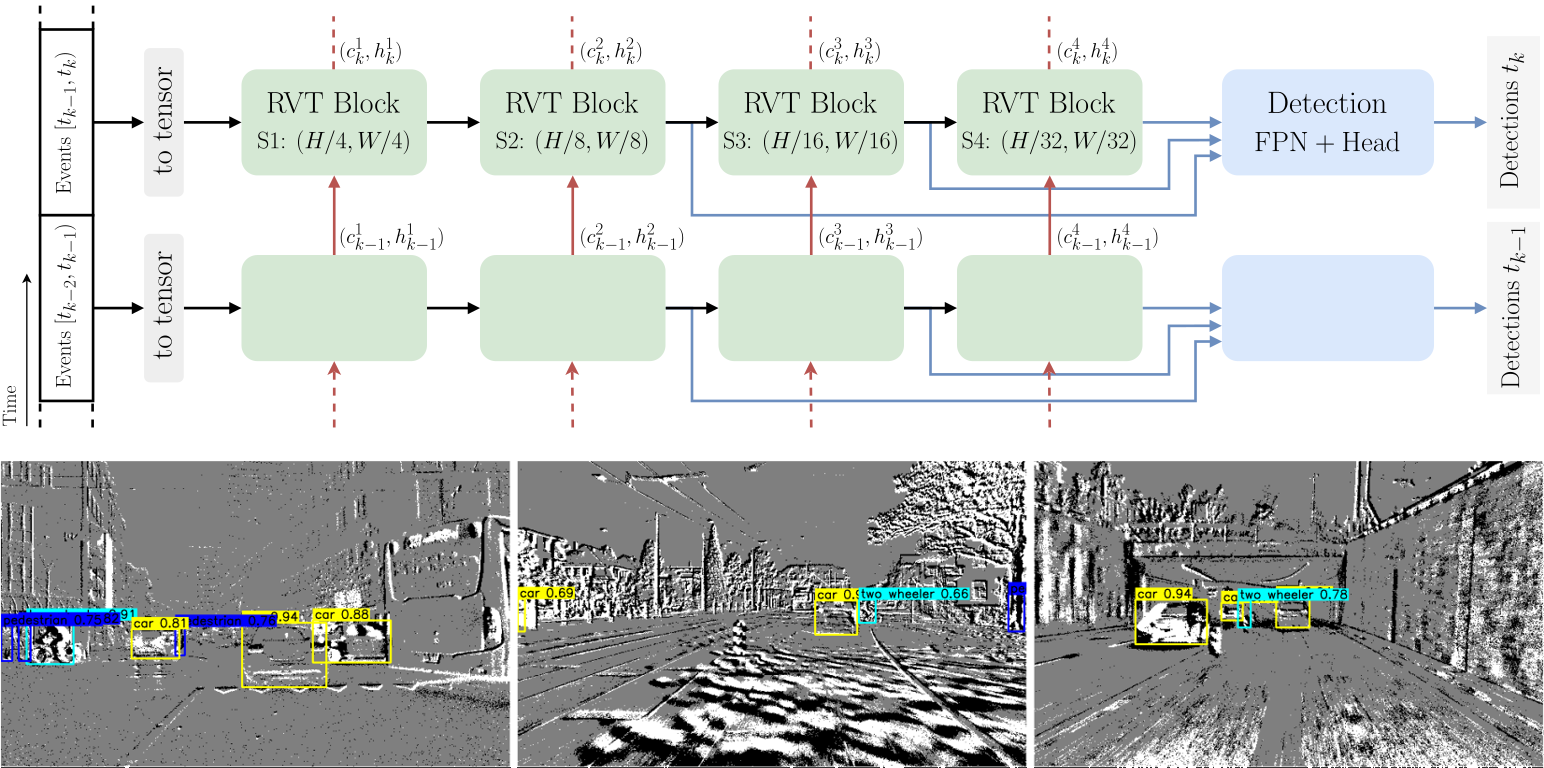
This is the modified RVT version for the CVPR 2024 paper eTraM: Event-based Traffic Monitoring Dataset.
We highly recommend to use Mambaforge to reduce the installation time.
conda env create -f environment.yamlIn case of error you can follow the original installation steps.
conda create -y -n rvt python=3.9 pip
conda activate rvt
conda config --set channel_priority flexible

CUDA_VERSION=11.8

conda install -y h5py=3.8.0 blosc-hdf5-plugin=1.0.0 \
hydra-core=1.3.2 einops=0.6.0 torchdata=0.6.0 tqdm numba \
pytorch=2.0.0 torchvision=0.15.0 pytorch-cuda=$CUDA_VERSION \
-c pytorch -c nvidia -c conda-forge

python -m pip install pytorch-lightning==1.8.6 wandb==0.14.0 \
pandas==1.5.3 plotly==5.13.1 opencv-python==4.6.0.66 tabulate==0.9.0 \
pycocotools==2.0.6 bbox-visualizer==0.1.0 StrEnum==0.4.10
python -m pip install 'git+https://github.com/facebookresearch/detectron2.git'
Detectron2 is not strictly required but speeds up the evaluation.
To evaluate or train RVT on eTraM you will need to download the eTraM dataset from Link to Dataset.
Run the following command to preprocess the dataset to required format
The preprocessed format is similar to gen4 (1Mpx) format with changes in the class labels.
python preprocess_dataset.py <DATA_IN_PATH> \
<DATA_OUT_PATH> \
conf_preprocess/representation/stacked_hist.yaml \
conf_preprocess/extraction/const_duration.yaml \
conf_preprocess/filter_gen4.yaml -ds gen4 -np <N_PROCESSES> # we use the same preprocessing as gen4 with modified classThe pre-trained checkpoint of RVT-base on eTraM is available here for your reference.
-
Set
DATA_DIRas the path to eTraM dataset directory -
Set
CKPT_PATHto the path of the correct checkpoint matching the choice of the model and dataset.to load either the base, small, or tiny model configuration
-
Set
USE_TEST=1to evaluate on the test set, orUSE_TEST=0to evaluate on the validation set
-
Set
GPU_IDto the PCI BUS ID of the GPU that you want to use. e.g.GPU_ID=0. Only a single GPU is supported for evaluation
python validation.py dataset=gen4 dataset.path=${DATA_DIR} checkpoint=${CKPT_PATH} \
use_test_set=${USE_TEST} hardware.gpus=${GPU_ID} +experiment/gen4="${MDL_CFG}.yaml" \
batch_size.eval=8 model.postprocess.confidence_threshold=0.001-
Set
DATA_DIRas the path to either the 1 Mpx or Gen1 dataset directory -
Set
MDL_CFG=base, orMDL_CFG=small, orMDL_CFG=tiny
to load either the base, small, or tiny model configuration
-
Set
GPU_IDSto the PCI BUS IDs of the GPUs that you want to use. e.g.GPU_IDS=[0,1]for using GPU 0 and 1. Using a list of IDS will enable single-node multi-GPU training. Pay attention to the batch size which is defined per GPU: -
Set
BATCH_SIZE_PER_GPUsuch that the effective batch size is matching the parameters below. The effective batch size is (batch size per gpu)*(number of GPUs). -
If you would like to change the effective batch size, we found the following learning rate scaling to work well for all models on both datasets:
lr = 2e-4 * sqrt(effective_batch_size/8). -
The training code uses W&B for logging during the training. Hence, we assume that you have a W&B account.
- The training script below will create a new project called
RVT. Adapt the project name and group name if necessary.
- The training script below will create a new project called
python train.py model=rnndet dataset=gen4 dataset.path=<DATA_DIR>\
	wandb.project_name=<WANDB_NAME> wandb.group_name=<WAND_GRP> \
	+experiment/gen4="default.yaml" hardware.gpus=0 batch_size.train=6 \
	batch_size.eval=2 hardware.num_workers.train=4 hardware.num_workers.eval=3 \
training.max_epochs=20 dataset.train.sampling=stream +model.head.num_classes=3This project has used code from the following projects:
- RVT for the official RVT implementation in Pytorch
- timm for the MaxViT layer implementation in Pytorch
- YOLOX for the detection PAFPN/head
@InProceedings{Gehrig_2023_CVPR,
  author  = {Mathias Gehrig and Davide Scaramuzza},
  title   = {Recurrent Vision Transformers for Object Detection with Event Cameras},
  booktitle = {Proceedings of the IEEE/CVF Conference on Computer Vision and Pattern Recognition (CVPR)},
  year    = {2023},
}