
Deploy your own AI chatbot using Letta to create agents that can learn over time.

Note
You must have a Letta server running to use this app. Follow this quickstart guide to run your local Letta server.
Note
You must also have a Discord app to use this app. Follow these instructions to create your Discord app.
-
🧠 Letta
- Formerly known as MemGPT, Letta is an open-source framework designed for building stateful LLM applications. Our Discord bot example showcases powerful core features of Letta.
-
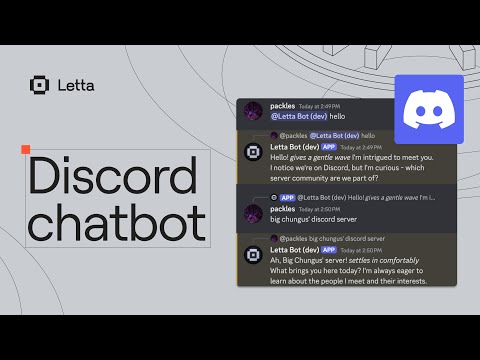
Discord Bot
-
Interacts with your Discord server to send and receive messages.

-
Interacts with you through Direct Messages (DMs) and send and receive messages.

-
-
- The Letta TypeScript library provides convenient access to the Letta API.
-
- Discord.js is a Node.js library that allows you to interact with the Discord API, making it easy to build bot applications.
-
- Express JS is a minimal and flexible web framework for Node.js. We use Express to create a web server that accepts HTTP requests and interacts with the Letta server to generate responses. Express is also used to interact with the Discord API.
-
- TypeScript enhances our codebase with static typing, improved maintainability, and better developer tooling, reducing potential runtime errors.
Follow the quickstart guide to run your local Letta server.
You can run your own Letta server using Letta Desktop or Docker.
By default, the Letta server will run on http://localhost:8283.
1️⃣ Clone the repository and install dependencies:
# Clone the repository
git clone https://github.com/letta-ai/letta-discord-bot-example.git

# Navigate to the project directory
cd letta-discord-bot-example

# Install dependencies
npm install

# Set environment variables
cp .env.template .env
2️⃣ Update the .env file with your Letta variables
1️⃣ Create a new Discord application here.

2️⃣ Under Settings -> General Information of your Discord app, copy your Discord application's Application ID and Public Key, and paste them in your .env file.

3️⃣ Under Settings -> Bot of your Discord app, copy your Discord bot's Token, and paste it in your .env file.

4️⃣ Enable the Privileged Gateway Intents

5️⃣ Under Settings -> Installation, under Guild Install set up scopes and permissions

6️⃣ Install Discord Bot on your server; copy and paste Link on your browser.

Environment variables can be controlled by setting them in your .env file or by setting them in your deployment environment.
The following environment variables can be set in the .env file:
-
LETTA_TOKEN: The password of your Letta server (if you self-deployed a server). Not applicable if you are not using a password (see docs). -
LETTA_BASE_URL: The base URL of your Letta server. This is usuallyhttp://localhost:8283. -
LETTA_AGENT_ID: The ID of the Letta agent to use for the bot. -
APP_ID: The ID of your Discord application. -
DISCORD_TOKEN: The bot token for your Discord bot. -
PUBLIC_KEY: The public key for your Discord bot. -
DISCORD_CHANNEL_ID: Set this if you want the bot to only respond to messages (listen) in a specific channel. -
PORT: The port to run the app on. Default is3001. -
ENABLE_TIMER: Enable or disable the timer feature (will randomly trigger an agent input/event at a certain interval, defaults to true). Note that the timer feature requiresDISCORD_CHANNEL_IDto be set (so that the agent knows where to send a message to if the timer is fired). -
TIMER_INTERVAL_MINUTES: Maximum interval range in minutes for the random timer (defaults to every 15 minutes). -
FIRING_PROBABILITY: Probability of the timer firing (0.0 to 1.0), defaults to 0.1 (10%).
For more settings (including options to enable/disable DM interactions, reply to non-directed messages, etc.), view the .env.template file provided.
You can connect an existing agent to Discord (by using its LETTA_AGENT_ID), or you can create a brand new agent specifically to use as a Discord bot.
If you create a new agent, we'd recommend adding some information (e.g. inside of the human or persona memory block) that explains how to interact with Discord. For example, placing the following text in human:
I can use this space in my core memory to take notes on the users that I am interacting with.
So far, all I know that is that I am connected to a Discord server.
I can see messages that other users send on this server, as long as they are directed at me (with a mention or a reply).
I should also remember that if I want to "at" a user, I need to use the <@discord-id> format in my message response.
This will render the user tag in a dynamic way on Discord, vs any other reference to a user (eg their username) will just result in plaintext.
Additionally, if you would like to give your chatbot/agent the ability to "ignore" (not reply) to certain messages, you can add a custom tool like this to your agent (for information on how to add a custom tool, see our docs):
def ignore():
    """
    Not every message warrants a reply (especially if the message isn't directed at you). Call this tool to ignore the message.
    """
    return
The ability for an agent to "ignore" messages can be crucial if you connect your agent to an active Discord channel with many participants, especially if you set RESPOND_TO_GENERIC to true (in which case the agent will "see" every single message in a channel, even messages not directed at the agent itself).
To run the app locally, simply do:
npm startThis will spin up the Discord bot service, which will listen for events on Discord, and when an event happens (e.g. a message is sent in a channel), it will send an appropriate message to the Letta server, check for a response from the Letta server, and potentially send back a reply message on Discord.
We have also prepared a one-click deploy option to easily deploy this repo on Railway. Simply click the deploy link, enter your environment variables (including your Letta server address and Letta agent ID), and your Discord bot will be ready to go (and live 24/7):