How to migrate from ArduinoIDE to e2studio
- Arduino IDE does not allow you to use debugger functions such as step execution or checking the value of an arbitrary variable, but you can use debugger functions by migrating to e2 studio.
- This guide explains how to migrate from Arduino IDE to e2 studio and start the debugger.
- The operating environment at the time this guide was prepared was as follows.
- e2 studio : 2024-10
- Arduino IDE : v2.3.3
- LLVM compiler : 17.0.1.202406
- RL78/G23 Arduino library : v2.4.0
- SdFat library : v2.2.2
- Stepper library : v1.1.3
-
Please download the Fast Prototyping Board project that is compatible with Arduino IDE from below.
Fast Prototyping Board e2 studio Project Version of LLVM compiler at the time of operation check RL78/G24 RL78/G24 Project LLVM for Renesas RL78 17.0.1.202409 RL78/G23-128p RL78/G23-128p Project LLVM for Renesas RL78 17.0.1.202409 RL78/G23-64p RL78/G23-64p Project LLVM for Renesas RL78 17.0.1.202406 RL78/G22 RL78/G22 Project LLVM for Renesas RL78 17.0.1.202406 RL78/G16 RL78/G16 Project LLVM for Renesas RL78 17.0.1.202409 RL78/G15 RL78/G15 Project LLVM for Renesas RL78 17.0.1.202406 -
If you do not have e2 studio installed, you can download it from the following site.
-
If you have not installed the version of LLVM compiler that we have confirmed works, you can download it from the following site.
-
- From the e2 studio menu bar, click [File] → [Import] → [Existing Project into Workspace] → [Next].
- Switch to [Select archive file:], click [Browse] to open the downloaded project, then click [Finish] to import the project.
-

- Right-click the imported project and click [Properties] to display the Properties window.
- On the Properties window, click [C/C++ Build], then [Settings], then [Toolchain].
- Change the version of LLVM compiler from [Change Toolchain] and click [Apply and Close].
-

-
If you build the downloaded project as is, an error will occur.
-
How to add a program:
-
Copy the program created in Arduino IDE to the downloaded project to the src folder by drag & drop.
-
-
Select [Copy files] and click [OK].
-
 *
* 
-
-
.ino files must be renamed to .cpp extension.
-
To change the extension, right-click on the .ino file and click [Rename].
-
Change the extension from .ino to .cpp and click [OK].
-
 *
* 
-
-
-
If you use SdFat library or Stepper library:
-
Please download the source code from the link below.
-
Unzip the downloaded source code and copy the src folder to the SdFat or Stepper folder by drag & drop.
-
-
Select [Copy files and folders] and click [OK].
-
-
-
Build Method:
- By default, all standard libraries are excluded from the build.
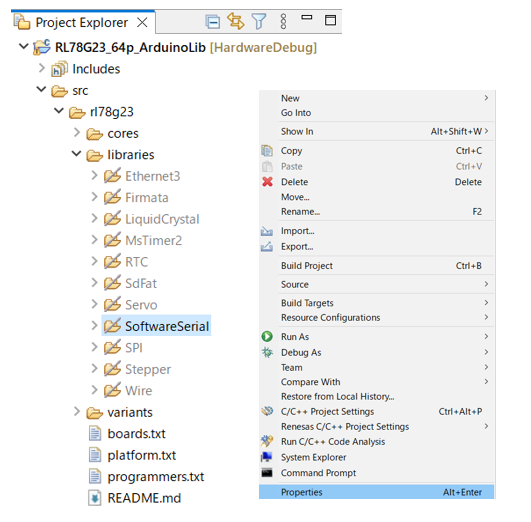
- To use a standard library, place the cursor over the folder of the standard library you wish to use, right-click, uncheck [Exclude resource from build] under [Properties] and click [Apply].
-
- To use SoftwareSerial as an example, right-click on the SoftwareSerial folder, and under [Properties] uncheck [Exclude resource from build] and click [Apply].
-
- Click [Project] → [Build Project] to build.
-
How to start the debugger:
- Click [Run] → [Debug Configurations] → [Debugger] and select [COM Port (RL78)] for Debug hardware.
- Then select the Connechion Settings tab and select the COM port number to use.
- Click [Debug] to start the debugger.
-