Class: com.ssomai.android.scalablelayout.ScalableLayout
ScalableLayout은 화면의 크기가 매우 다양한 안드로이드 폰과 태블릿 환경에서
일관성 있는 UI를 표현하기 위한 방법 중의 하나입니다.
ScalableLayout은 android에서 widget을 감싸는 용도로 쓰이는
FrameLayout 이나 LinearLayout 대신 이용될 수 있는 Layout 입니다.
UI를 구성하는 TextView나 ImageView 같은 view 들은
ScalableLayout 안에서 상대적인 (x,y) 좌표와 (width, height) 값을 부여받은 뒤,
ScalableLayout 의 크기가 변함에 따라 비율에 맞춰 위치와 크기가 변화됩니다.
TextView나 EditText같이 텍스트가 들어가는 view들은 (text size) 값을 부여하면
텍스트 크기가 ScalableLayout의 크기에 맞춰서 변화됩니다.
ScalableLayout은 단 하나의 java file을 import하는 것만으로 모든 기능을 제공합니다.
Java 또는 XML 의 Android 에서 UI를 구성하는 두가지 방법 모두에서 ScalableLayout을 이용할 수 있습니다.
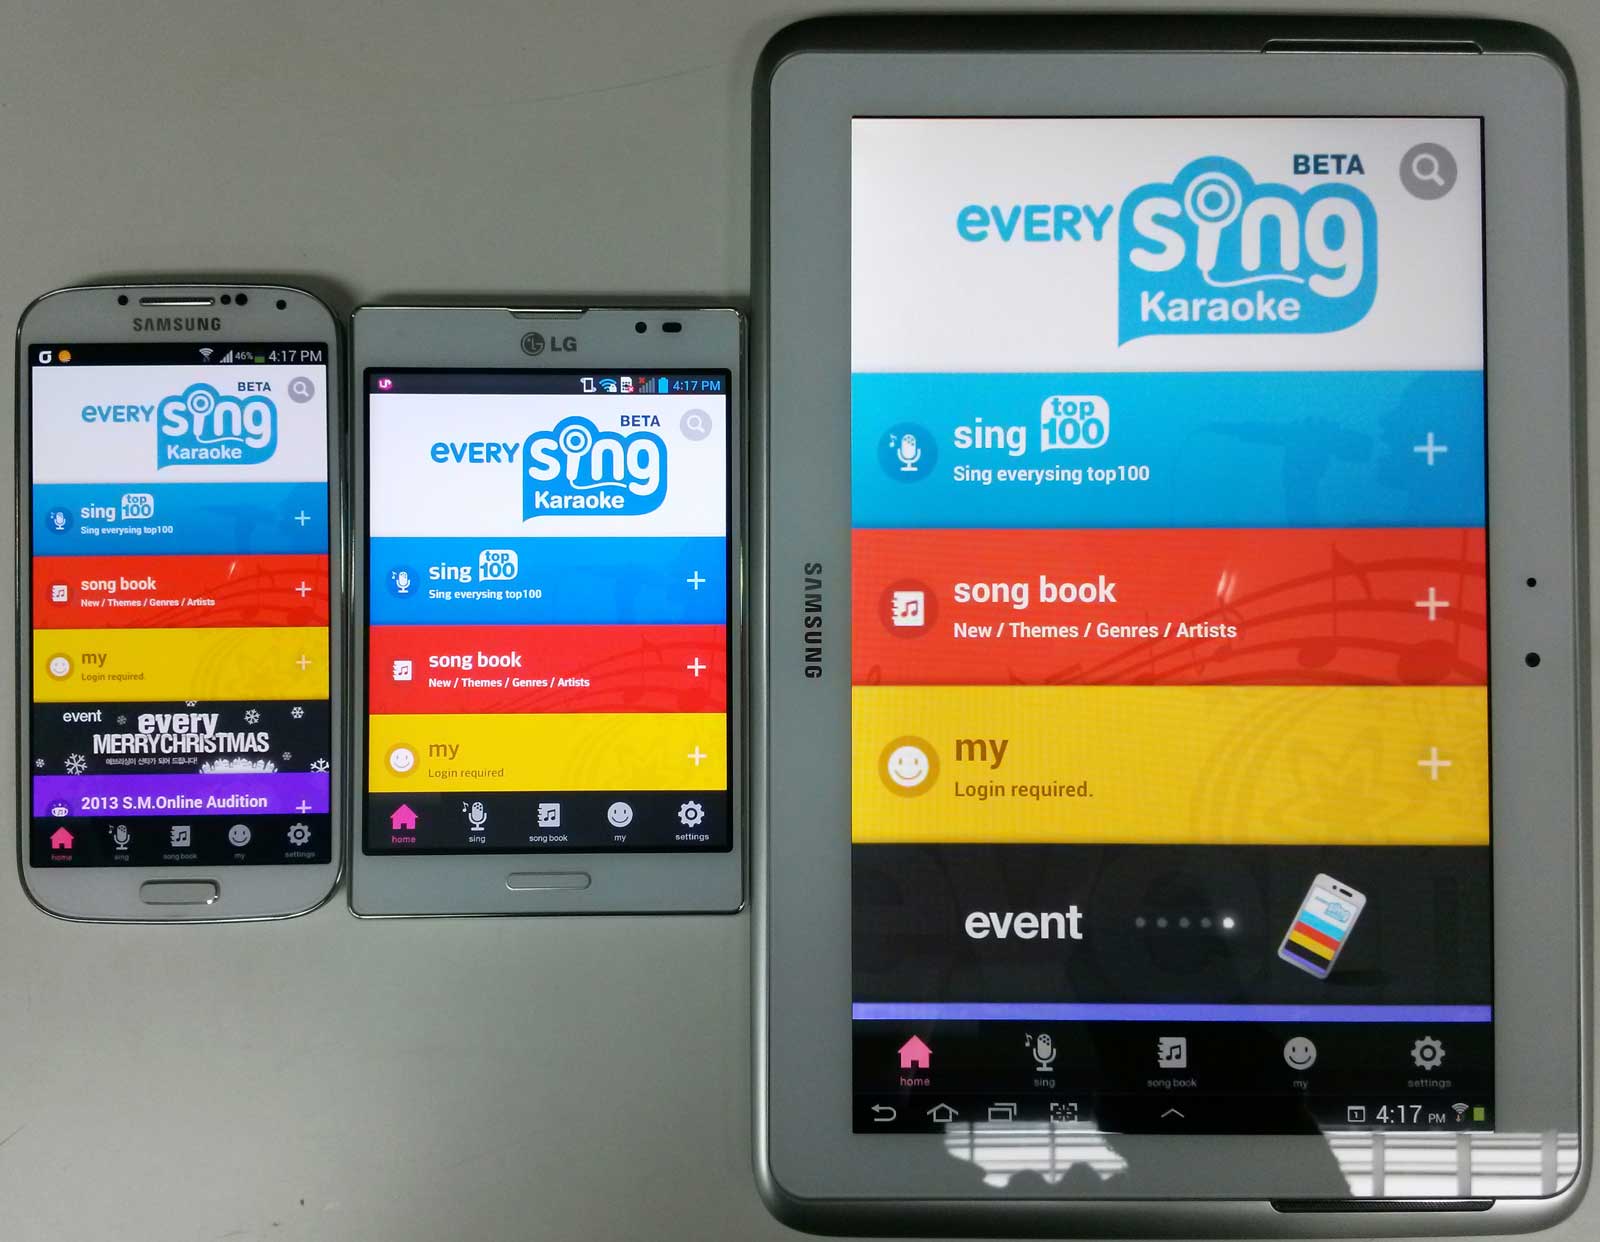
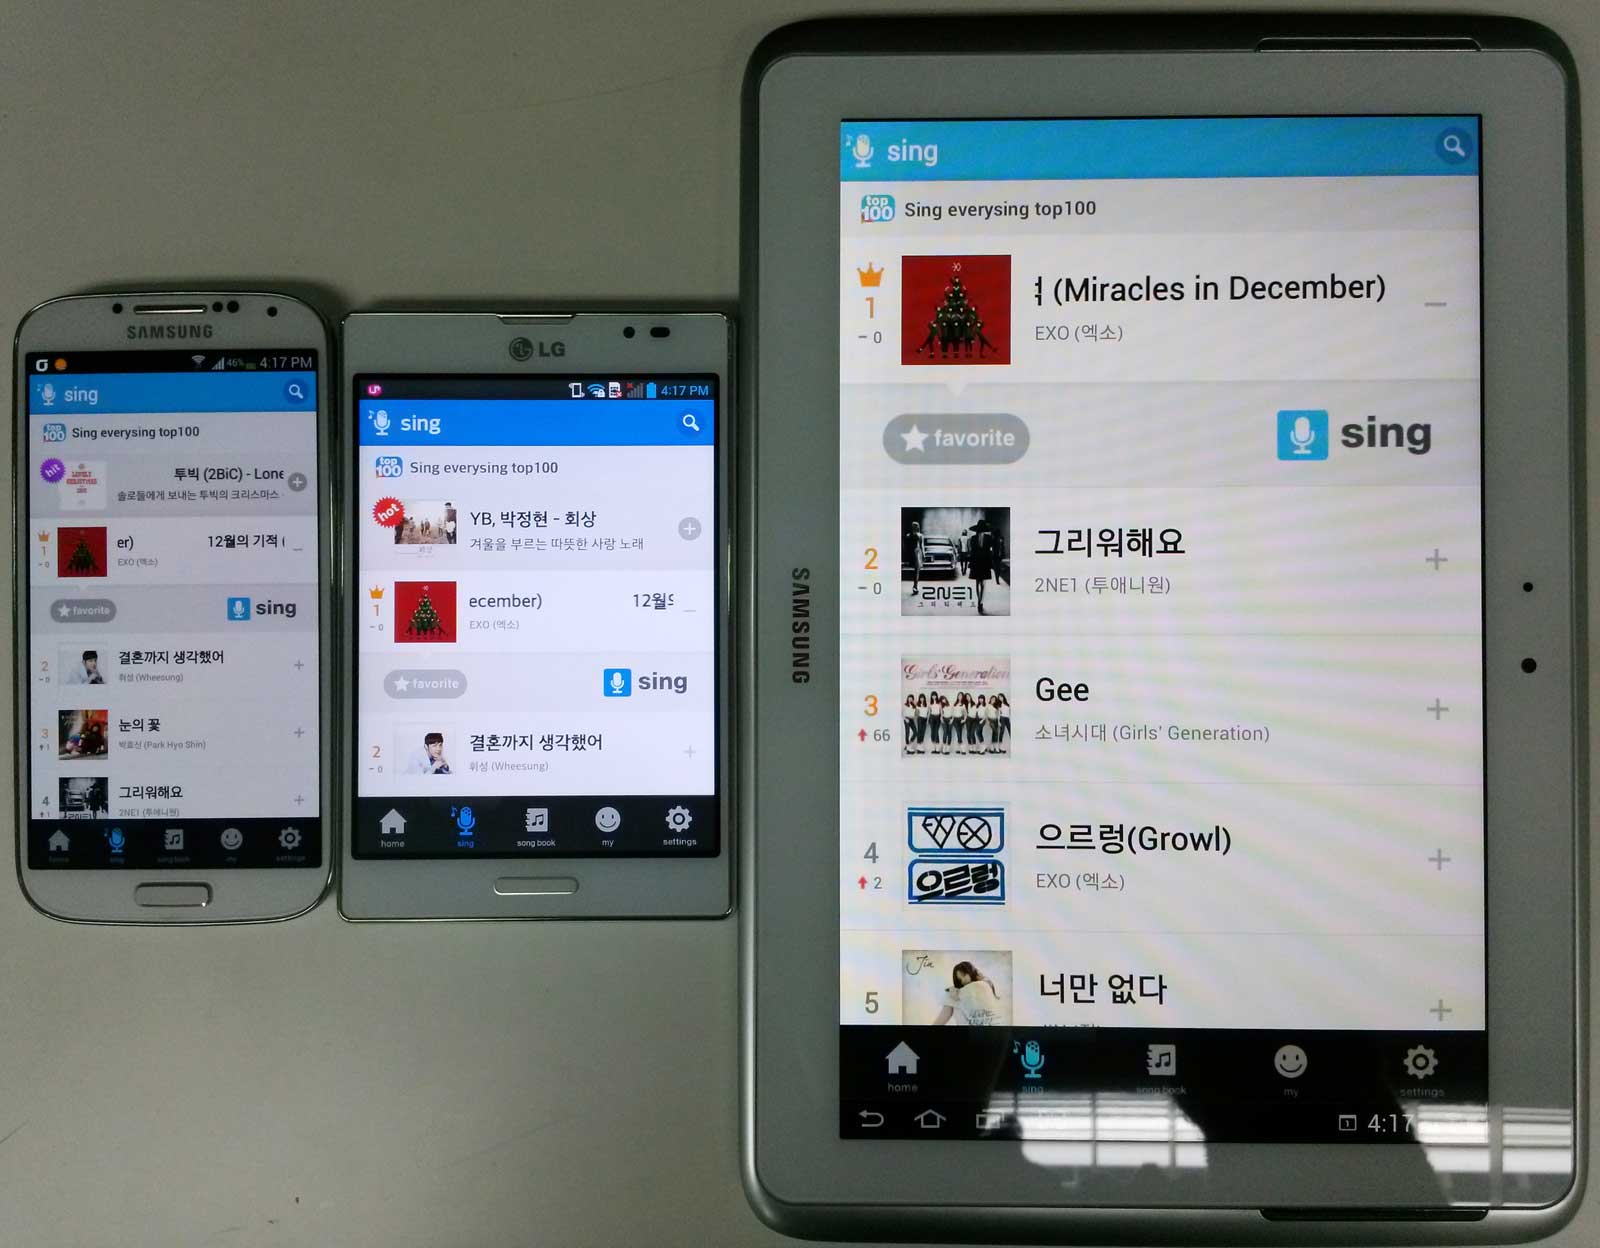
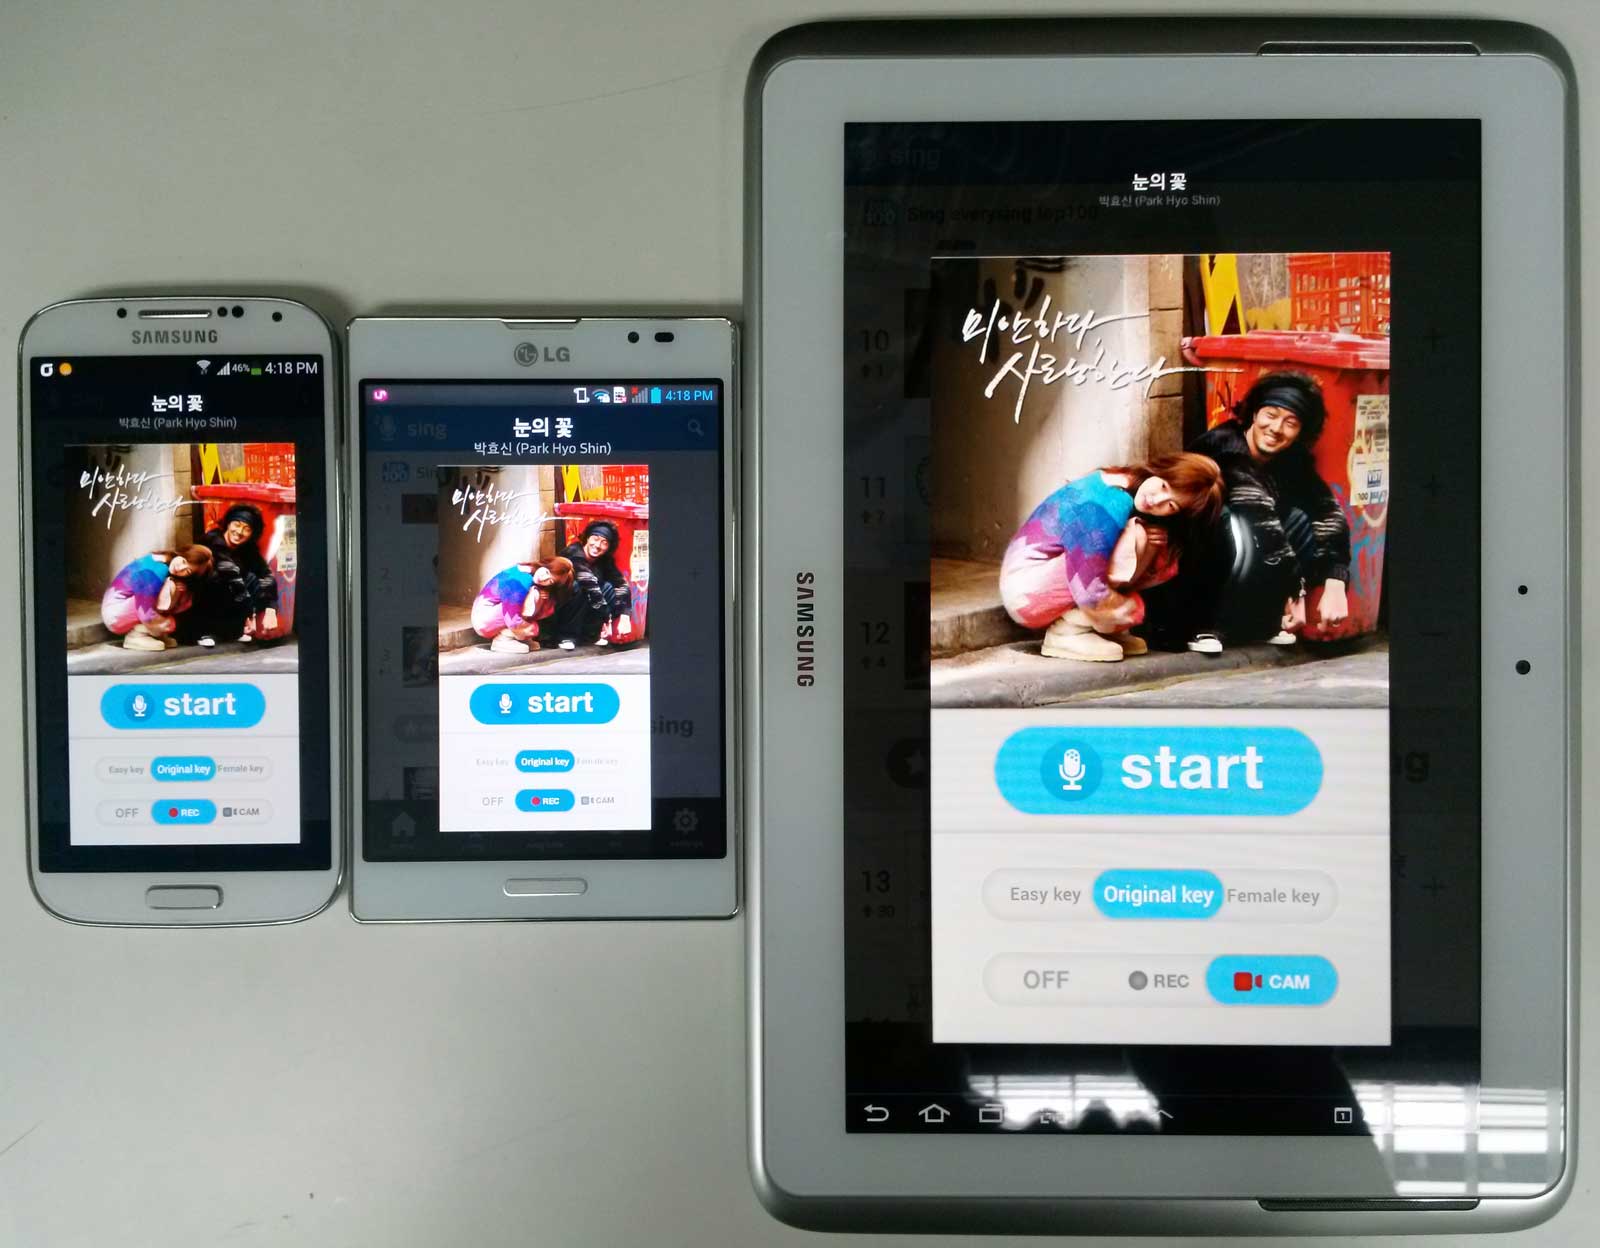
ScalableLayout은 2013년에 Google Play에서 빛난 올해의 앱 모음에 선정된
S.M.ENTERTAINMENT의 everysing 앱에서도 이용되어 그 우수성을 증명한 바 있습니다.
이 소스를 Maven Central에 AAR 형태로 퍼블시켰습니다.
그래서 안드로이드 스튜디오나 gradle을 사용하시는 분께서는 아래 dependencies를 build.gradle에 추가해주시면 바로 사용해보실수 있습니다.
dependencies {
  compile 'com.ssomai:android.scalablelayout:2.1.6'
}// ScalableLayout의 사이즈를 400 x 200 으로 설정합니다.
// 상대적인 단위로 pixel 이나 dp 단위가 아닙니다.
ScalableLayout sl = new ScalableLayout(this, 400, 200);
// ScalableLayout에 TextView를 넣어보겠습니다.
TextView tv = new TextView(this);
// 왼쪽 x 좌표는 20, y좌표는 40, width는 100, height는 30으로 ScalableLayout에 TextView를 넣습니다.
// 단 한줄의 코딩으로 view를 넣은 후 이후에는 자동으로 리사이즈 됩니다.
sl.addView(tv, 20f, 40f, 100f, 30f);
// TextView 안의 text의 사이즈를 20으로 설정합니다. text의 사이즈도 자동으로 조절됩니다.
sl.setScale_TextSize(tv, 20f);
// 기존의 TextView 함수들이 물론 정상적으로 작동합니다.
tv.setText("test");
tv.setBackgroundColor(Color.YELLOW);
// ScalableLayout에 ImageView를 넣어보겠습니다.
ImageView iv = new ImageView(this);
// 왼쪽 x 좌표는 200, y좌표는 30, width는 50, height도 50으로 ScalableLayout에 ImageView를 넣습니다.
// 단 한줄의 코딩으로 view를 넣은 후 이후에는 자동으로 리사이즈 됩니다.
sl.addView(iv, 200f, 30f, 50f, 50f);
// 마찬가지로 기존의 ImageView 함수들이 물론 정상적으로 작동합니다.
iv.setImageResource(R.drawable.ic_launcher);xml에서 사용하실때는 최상단의 ViewGroup에서 아래 코드가 추가되어 있어야 합니다. xmlns:app에서 app은 어떤 문자열이든 상관은 없습니다만, 이 값과 동일하게 그 아래에서 사용해야 합니다.
xmlns:app="http://schemas.android.com/apk/res-auto"
<FrameLayout
    xmlns:android="http://schemas.android.com/apk/res/android"
    xmlns:tools="http://schemas.android.com/tools"
    xmlns:app="http://schemas.android.com/apk/res-auto"
    android:layout_width="match_parent"
    android:layout_height="match_parent"
    >
	<com.ssomai.android.scalablelayout.ScalableLayout
	  android:layout_width="match_parent"
	  android:layout_height="wrap_content"
	  android:background="@android:color/darker_gray"
	  android:layout_above="@+id/main_textview"
	  app:scale_base_width="400"
	  app:scale_base_height="200">
	  <TextView
		android:layout_width="wrap_content"
		android:layout_height="wrap_content"
		app:scale_left="20"
		app:scale_top="40"
		app:scale_width="100"
		app:scale_height="30"
		app:scale_textsize="20"
		android:text="@string/hello_world"
		android:textColor="@android:color/white"
		android:background="@android:color/black" />
	  <ImageView
		android:layout_width="wrap_content"
		android:layout_height="wrap_content"
		app:scale_left="200"
		app:scale_top="30"
		app:scale_width="50"
		app:scale_height="50"
		android:src="@drawable/ic_launcher" />
	</com.ssomai.android.scalablelayout.ScalableLayout>
</FrameLayout>왼쪽부터 삼성 갤럭시 S4 (1920 x 1080. 16:9), LG 옵티머스 뷰2 (1024 x 768. 4:3), 갤럭시 노트 10.1 (1280 x 800. 8:5)
direction은 wrapcontent할 방향을 지정하는 값입니다.
resizesurrounded는 TextView를 감싸고 있는 View들도 TextView크기 변화에 맞춰서 같이 변하게 할것인지 지정하는 값입니다.
movesiblings는 wrapcontent할 방향에 있는 view들도 TextView크기 변화에 맞춰서 같이 이동시키게 할것인지 지정하는 값입니다.
app:textview_wrapcontent_direction="bottom"
app:textview_wrapcontent_resizesurrounded="true"
app:textview_wrapcontent_movesiblings="true"
<?xml version="1.0" encoding="utf-8"?>
<LinearLayout
	xmlns:android="http://schemas.android.com/apk/res/android"
	xmlns:app="http://schemas.android.com/apk/res-auto"
	android:orientation="vertical"
	android:layout_width="match_parent"
	android:layout_height="match_parent"
	>
    <com.ssomai.android.scalablelayout.ScalableLayout
        android:layout_width="match_parent"
        android:layout_height="wrap_content"
        android:background="#FFFFFF"
        app:scale_base_width="1242"
        app:scale_base_height="1200"
        >
        <TextView
            android:layout_width="wrap_content"
            android:layout_height="wrap_content"
            app:scale_left="300"
            app:scale_top="300"
            app:scale_width="700"
            app:scale_height="50"
            app:scale_textsize="100"
            app:textview_wrapcontent_direction="bottom"
            app:textview_wrapcontent_resizesurrounded="true"
            app:textview_wrapcontent_movesiblings="true"
            android:text="test long text: Hi, everybody. It's good to see you."
            />
        <ImageView
            android:layout_width="wrap_content"
            android:layout_height="wrap_content"
            app:scale_left="100"
            app:scale_top="220"
            app:scale_width="1000"
            app:scale_height="50"
            android:background="#00FF00"
            />
        <ImageView
            android:layout_width="wrap_content"
            android:layout_height="wrap_content"
            app:scale_left="100"
            app:scale_top="350"
            app:scale_width="50"
            app:scale_height="500"
            android:background="#0000FF"
            />
        <ImageView
            android:layout_width="wrap_content"
            android:layout_height="wrap_content"
            app:scale_left="1100"
            app:scale_top="400"
            app:scale_width="50"
            app:scale_height="500"
            android:background="#00FFFF"
            />
        <ImageView
            android:layout_width="wrap_content"
            android:layout_height="wrap_content"
            app:scale_left="100"
            app:scale_top="600"
            app:scale_width="1000"
            app:scale_height="50"
            android:background="#FF0000"
            />
    </com.ssomai.android.scalablelayout.ScalableLayout>

</LinearLayout>아래 링크의 이슈를 주셔서 작업했습니다. #49
app:textview_wrapcontent_scale_maxwidth="286"
와 같이 사용하면 됩니다. TextView가 내용에 맞춰서 크기가 조절이 되는 중에 그 크기의 최댓값을 지정해줍니다. Android Studio의 Preview에서도 쉽게 확인하실 수 있습니다.
ScalableLayot으로 화면 전체를 layout하시는 것은 추천하지 않습니다. 그 이유는 폰마다 화면 비율이 다르기 때문입니다. ScalableLayout은 지정받은 비율을 그대로 유지합니다. 즉, 600 x 1000 로 지정하셨다면 그 비율을 그대로 유지합니다.
추천드리고 싶은 방법은 LinearLayout이나 FrameLayout, RelatvieLayout등을 최상위로 두시고,
화면 비율이 달라질때마다 대응할 수 있도록 flexible한 공간을 만드세요.
그리고 ScalableLayout은 화면 내의 일부분들에 대해서만 사용하시면 됩니다.
예를 들어서 화면 아래의 TabBar를 ScalableLayout으로 쓰거나
ListView나 RecyclerView내의 ItemView에 대해서 쓰는 등으로 하시면 다양한 해상도 대응에 편해집니다.
그리고 기획이나 디자인 단계에 종사하시는 분께 안드로이드에서는 화면비율이 달라지는것을 항상 고려해달라고 부탁드려주세요. ㅎㅎ